How it Works
The Candle Maker is your fast-track to great results
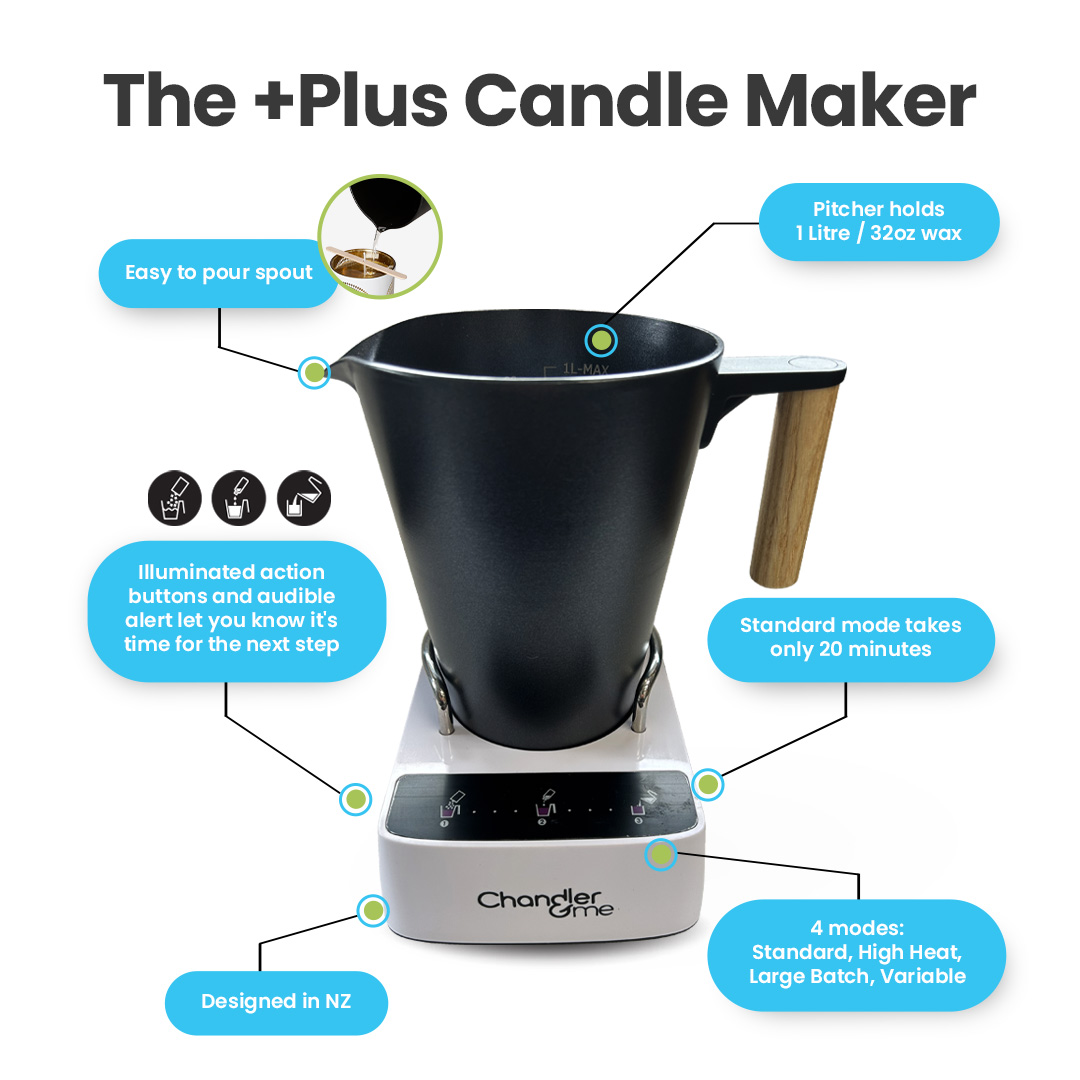
Our clever little wax melter gives you precise control over the most critical stages of the candle making process; wax melting, fragrance stirring and binding, and stable temperature management. This is the “go to” tool for serious hobbyists and boutique candle businesses seeking consistent results and simplicity of production.
Step 1 - Add the wax
Measure out your wax and tip into the pitcher, then press the first button. Your wax will proceed to melt and stir until it reaches the perfect temperature for adding fragrance. No need to watch over it, just relax.


Step 2 - Add the fragrance
The lights on the Candle Maker will indicate when it’s time to add your fragrance. Pour it in then press the next button and watch as the Candle Maker stirs and blends the fragrance through the wax. A well-mixed fragrance will ensure a great “scent throw” throughout the life of your candle.
Step 3 – Pour your candle
When the last light flashes, your wax will have completed a precise temperature curve, and the fragrance molecules will be “bound” completely into your wax (critical for superior scent throw). Your wax is now being held at around 140F and it’s time to gently pour into your jar.
Clean up is a breeze, simply wipe the pitcher out with a paper towel before rinsing with a dash of soap and warm water, dry with a paper towel and you are ready to make more candles.


Handy hints for best results
- Try to keep the room temperature stable and don’t let air-con units or fans blow onto the candle while it sets
- Pour your candle in a spot where it can remain undisturbed during the cooling and setting phase
- If pouring on a stone benchtop place a wooden breadboard or a folded tea towel under the candle; this will help to avoid heat a “heat sink” being created, which can cause uneven setting and imperfections in your candle.
- Wait until the candle fully solidifies and “cures” (ideally 2-3 days) before trimming the wick to about a 1/4 inch. Light and enjoy hours of ambient home fragrance from your very own candle
- Use your candle within 6 months. When it is finished simply wash out the residue from the jar and make another candle in it
"(Required)" indicates required fields